Chat Webapp with JavaScript
About
In this project we will create a very simple web application that we can use to
have a conversation with ChatGPT. We will be using JavaScript as the
programming language. We will use the
openai api. For this
example we will not use npm or other package managers, but build a static web
app with plain JS and HTML.
NOTE: This project will require you to have a paid openai account. This means that you will an API KEY that you can find on your openai account. You will have to use this API key in the web application.
Walkthrough
Setup
First you will have to create a directory to contain the source code
mkdir chatgpt-webapp
cd chatgpt-webapp
Next we need to create the home page of the app
touch index.html
This file will host all the JS and HTML code needed to build the frontend of the app.
Now we need to setup the bare minimum on our page
<!DOCTYPE html>
<html lang="en">
<head>
    <meta charset="UTF-8">
    <title>Chat App</title>
    <script type="module" src="https://cdn.jsdelivr.net/npm/openai@3.3.0/+esm"></script>
</head>
<body>
    TODO
</body>
</html>
Here we setup the page title and in the body we will add the code responsible for creating the chatbox and the history of the chat. In the head of the document we will also add the openai dependency, that will help us make requests for the Chat API later on.
Next let’s define our template of the web app. It will be a very basic one, with no styling, since that is not the goal of this tutorial. We will have to change the body of the html with
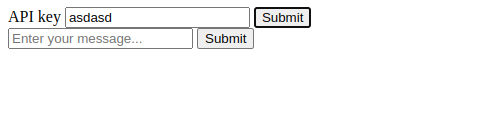
<body>
    <div>
        <label for="openai-key">API key</label>
        <input type="text" id="openai-key" placeholder="Enter the API key...">
        <button id="openai-key-submit">Submit</button>
    </div>
    <div id="chat-history"></div>
    <div>
        <input type="text" id="chat-input" placeholder="Enter your message...">
        <button id="chat-submit">Submit</button>
    </div>
</body>
The first div will give us the input text box for the openai api key, which we will need to be able to generate responses from ChatGPT. The second div will be the parent of all the messages that we will have with the chatbot. And the last div will contain the input text box for the message that we want to send to the AI.
Now we want to be able to interact with the buttons, so we have to add
javascript code that will handle it. We will start with the openai key button.
Now we have to declare the said function. We can do that in a script tag
inside the body of the html.
<body>
    <!-- the divs here -->

    <script>
        let apiKey = null;

        function handleOpenaiKeySubmit() {
            const key = document.getElementById("openai-key").value;
            apiKey = key;
        }

        document.getElementById("openai-key-submit").addEventListener("click", handleOpenaiKeySubmit);
    </script>
</body>
This will store the api key in a global variable called apiKey once you click
on submit.
Now let’s build with a similar approach the interaction for the other submit button. And now define the handleChatSubmit function (you can do that inside the same script tag).
<body>
    <!-- the divs here -->

    <script>
        // the other js here

        function handleChatSubmit() {
        }

        document.getElementById("chat-submit").addEventListener("click", handleChatSubmit);
    </script>
</body>
Now this function will be called when we click on the chat submit button. But
now we also have to add the openai code to this function. To be able to do that
we need to make some changes. First, we have to add a property to the script tag,
and change it to <script type="module"> this will allow us to import the
necessary stuff from the openai library.
The new script tag should look like the following, with the rest of the code inside.
<body>
    <!-- the divs here -->

    <script type="module">
        import openai from "https://cdn.jsdelivr.net/npm/openai@3.3.0/+esm";

        // the functions with clicks here
    </script>
</body>
Now let us go through how to make the request to chatgpt and then build the function. First we will need to get the user message
const message = document.getElementById("chat-input").value;
Next we can build the openai object with the key that we provided earlier
const configuration = new openai.Configuration({
    apiKey: apiKey,
});
const openai_api = new openai.OpenAIApi(configuration);
Now we have to send the request and wait for it to finish. For this we will
have to use the await keyword
const chatCompletion = await openai_api.createChatCompletion({
    model: "gpt-3.5-turbo",
    messages: [{role: "user", content: message}],
});
And we finally get the chatbot message back (we mostly assume that it worked, but usually it will not fail)
const response = chatCompletion.data.choices[0].message;
Now we can do whatever we want with the response. For example just print it, or by creating some sort of chat window (like we are going to). But now let’s see the entire function
async function handleChatSubmit() {
    const message = document.getElementById("chat-input").value;

    const configuration = new openai.Configuration({
        apiKey: apiKey,
    });
    const openai_api = new openai.OpenAIApi(configuration);

    const chatCompletion = await openai_api.createChatCompletion({
        model: "gpt-3.5-turbo",
        messages: [{role: "user", content: message}],
    });

    const response = chatCompletion.data.choices[0].message;

    console.log(response);
}
Since we had to use await in the body of the function, we need to declare it
as async.
To show the response/messages in the chat box, we need a new function that we can use to generate divs programatically. You can add this function in the script tag.
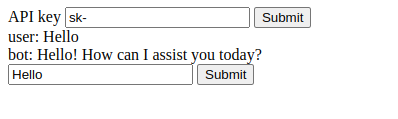
function createChatElement(who, message) {
    const div = document.createElement("div");
    div.innerText = `${who}: ${message}`;

    document.getElementById("chat-history").appendChild(div);
}
and then we need to change the handleChatSubmit function to use this helper
function, by adding
createChatElement("user", message);
createChatElement("bot", response.content);
instead of the console.log call.
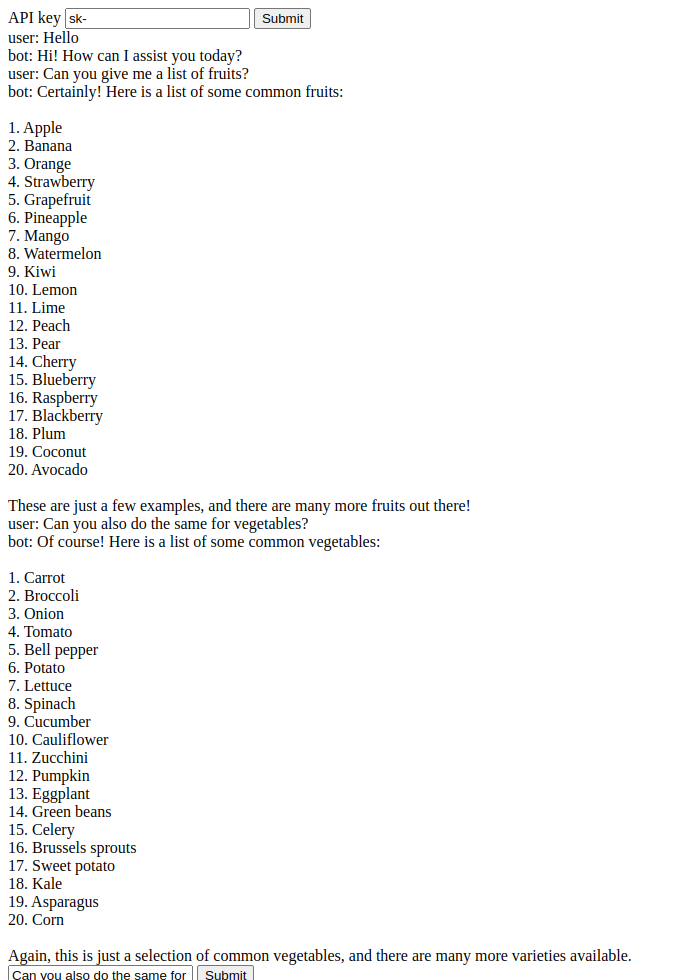
Now you have probabably noticed a problem. The chatbot does not keep track of the past messages. It always answer to the latest one without any context. To fix that we have to follow the same approach as we did in the CLI Chat with Python project, by keeping a list of all the messages.
First declare the history variable after the let apiKey = null; variable.
let apiKey = null;
let history = []; // initialize the empty history
Then we have to update the handleChatSubmit function like following
async function handleChatSubmit() {
    const message = document.getElementById("chat-input").value;

    history.push({role: "user", content: message}); // add the user message to the history

    const configuration = new openai.Configuration({
        apiKey: apiKey,
    });
    const openai_api = new openai.OpenAIApi(configuration);

    const chatCompletion = await openai_api.createChatCompletion({
        model: "gpt-3.5-turbo",
        messages: history, // use the history in the completion
    });

    const response = chatCompletion.data.choices[0].message;

    createChatElement("user", message);
    createChatElement("bot", response.content);

    history.push(response); // add the bot message to the history
}
Now this fixed the issue and we can have a better conversation with the chatbot
Conclusion
Now you have a fully working “clone” of chatgpt. However it has some visual limitations (a lot of them I know). But I hope that this gives you an idea of how to use html and js to build a quick web page to use chatgpt.
Homework
Finally, I think that now that you have a working web page you can actually try to improve it and add extra features and tweaks.
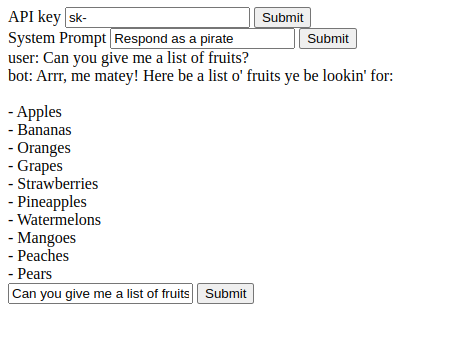
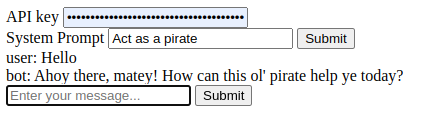
- Add another input box for the system prompt
Solution
First you need to create the div element that will hold the system prompt
<div>
    <label for="chat-system">System Prompt</label>
    <input type="text" id="chat-system" placeholder="Enter the system prompt...">
    <button id="chat-system-submit">Submit</button>
</div>
Then you will have to define the on click handler
function handleChatSystemSubmit() {
    const system = document.getElementById("chat-system").value;
    history = [{role: "system", content: system}];

    document.getElementById("chat-history").innerHTML = "";
}

document.getElementById("chat-system-submit").addEventListener("click", handleChatSystemSubmit);
The handler should reset the history and set the first message to the text that you get from the input box. It should also set the role to system. And finally it should make sure that the content of the chat is cleared to make it clear that this is a new conversation.
- Make the text from the input box clear after you click on submit
Solution
Similarly to how you can get the value of an input box you can also set it. You can use the following code in the chat input submit handler to clear the text once you submit
document.getElementById("chat-input").value = "";
- Make it possible to press enter and register the submit without the need of a button
Solution
For this task I will show how you can achieve this for the chat input text box.
You have to add a listener for the keydown event for the input box (the
input element itself, not the button). If the keyCode is 13
https://developer.mozilla.org/en-US/docs/Web/API/KeyboardEvent/keyCode then
we can call to the handleChatSubmit function. The same function that we use
with the click event. An interestin site for key codes
https://www.toptal.com/developers/keycode.
document.getElementById("chat-input").addEventListener("keydown", function(event) {
    if (event.keyCode === 13) {
        handleChatSubmit();
    }
});
- Make the api key input behave like a password (it should show
*instead of the characters)
Solution
To make it show as a password you just need to chagne the type from text to
password for the given input element.
<input type="password" id="openai-key" placeholder="Enter the API key...">
- Try to minimize the number of buttons
Solution
For this task I had in mind that you would just remove the buttons and the on click binding, and move the call to the handlers in the on click event of the last submit button.
- Remove the first button (for example this one)
<button id="openai-key-submit">Submit</button>
- Remove the code that assigns the handlers to the click events (for example this one, since the button is no longer in the page)
document.getElementById("openai-key-submit").addEventListener("click", handleOpenaiKeySubmit);
- add the call to the handler in the submit of the last button
async function handleChatSubmit() {
    handleOpenaiKeySubmit();

    // the rest of the code
}
This way, you will have only one button. However, the functionality of the app will be a bit different. Since now, instead of being able to set each field individually, you will set all of them at once.
- Try to play with some css for the app (take a look at tailwind)